0 results for "i use do"
Products
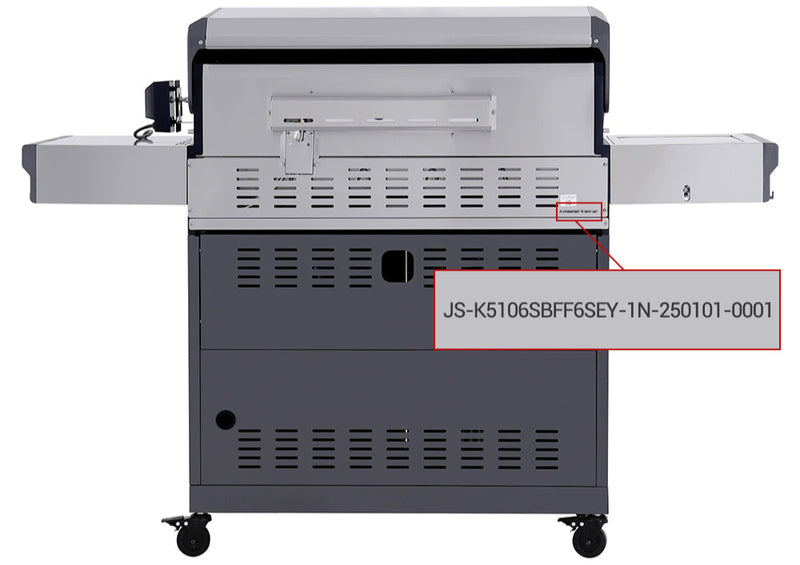
The serial number is located on the right side of the firebox, under the side burner, on the shelf, or on the back of the grill.
On the Replacement Finder page, select your grill model, then browse and click the part you want to view its product page and place an order.
Troubleshooting
If the display shows a black screen, please try the following:
- Plug the display into a USB power source to check if it turns on.
- Replace all 4 batteries with new ones.
- Reconnect the battery box and the display cable.
If the display shows an “ERP Alarm”, please reconnect the display screen and probe connection cables to ensure they are properly connected. If the alarm persists, contact customer support.
If the Bluetooth connection fails, press and hold the "+" and "–" buttons for 2 seconds to reset Bluetooth. Then open the mobile app and search for the device again.
First, replace all 4 batteries and check if the display works. If the issue continues, remove and reinsert the battery compartment and reconnect the display cable to ensure a proper connection.
If one light board is not on:
- If it doesn’t light up on the first try or the knob is flashing, press the knob again to retry.
- Reconnect the lamp board and its connection cable.
If all lights are not on:
- If it doesn’t light up on the first try or the knob is flashing, press the knob again to retry.
- Replace the battery and check if the lights turn on.
- If it still doesn’t work, reinsert the connection cable and the battery compartment connections.
- Check the battery orientation and make sure it’s installed correctly. If correct, try replacing the battery.
- Ensure the igniter connector is properly connected.
- Perform a soap water test on the regulator, pipes, and connections. No bubbles = no leak. Some hissing may just be normal airflow inside the regulator.
- Check for leaks at the regulator by observing the pipe, handwheel, and valve body. If bubbles appear, replace the pressure regulator with a new one.
- Check the cylinder connection for leaks. If the cylinder sealing ring is aged or cracked, replace the sealing ring or the cylinder.
- Tap the regulator. Wear gloves and gently tap the regulator body and connection points 5+ times, then try relighting.
- Reset the regulator. Close all knobs, wait 5+ seconds, then open and ignite each burner one by one.
- Reinstall the regulator. If resetting fails, remove and reinstall the regulator, keep knobs closed, and relight.
- Clear nozzle blockages. Remove the burner and pass a <1mm needle or wire through the nozzle several times. Reinstall burner and spring clip, then relight.
- Clean burner holes. Brush all fire holes to remove oil residue, then relight.
- Check gas supply. Connect a full 9 kg gas cylinder and attempt ignition again.
- Check the gas cylinder. If it is less than half full, flame size may decrease by over 30%, and at 30% or less, output pressure drops about 50%.
- If airflow pressure is abnormal, reset the regulator by closing all knobs, waiting more than five seconds, then opening each knob one by one and relighting.
- If resetting does not work, remove the regulator, reinstall it, keep all knobs closed, and relight.
- Wear gloves and tap the regulator body and connection points at least five times, then try relighting.
- Remove the burner and clear nozzle blockages with a needle or wire smaller than 1 mm. Reinstall the burner and spring clip, then relight.
- Brush all burner holes to remove oil residue and ensure proper flame.
- Connect a full 9 kg gas cylinder and try igniting again.
This issue may be caused by a damaged valve inside the control panel. If the flame remains too high and cannot be reduced using the control knobs, please contact our customer support team for further diagnosis. If necessary, we will assist with replacing the appropriate parts to resolve the issue.
- Check the gas cylinder. If it is empty, replace it with a full one.
- Remove the burner and clear nozzle blockages using a needle or wire smaller than 1 mm. Repeat at least five times, then reinstall the burner and spring clip and relight.
- If the regulator has activated its safety shutoff, close all knobs, wait more than five seconds, then open each knob one by one and relight.
To safely check for a gas leak, please follow these steps:
- Make sure all grill control knobs and the gas cylinder valve are turned OFF.
- Connect the pressure regulator securely to the gas cylinder.
- Apply soapy water to all connection points, including the gas cylinder valve, regulator connection, and hose fittings.
- Slowly turn on the gas valve and observe the soapy water.
- If bubbles appear or expand, a gas leak is present. Turn off the gas immediately and do not use the grill until it is fixed.
Please troubleshoot in the following order:
Check the propane tank
Make sure the tank is not empty. Refill or replace it if needed.
Inspect the ignition system
Check the igniter, battery, and all ignition wires to ensure they are properly connected and working.
Check the control valve
If the ignition components are functioning normally, the control valve may be faulty. In this case, the control panel assembly will need to be replaced.
Turn off the grill and clean the burners and flame tamers. Then restart the grill to see if the issue is resolved.
If the problem persists after cleaning, please contact customer support.
Please check the following:
Propane tank is low or empty.
A flashing red icon means the tank is below 10%. Replace the propane tank with a full one.
(Green: >60%, Yellow: 20–60%, Red: 10–20%)
Grill is converted to natural gas.
The tank weighing function is not required. Disconnect the tank weight sensor, unplug the power supply, wait 2 seconds, then plug it back in.
Sensor was disconnected during use.
Press the metal reset button on the grill to restart the system and clear the flashing icon.
Press the upper latch on the door assembly to remove the door. Reinstall it and slightly adjust the upper hinge until the door is properly aligned and closes smoothly.
User Guide
To ensure safe operation and stable performance, please follow these guidelines when using your grill regulator.
Before use:
- Ensure all control knobs are OFF and the regulator is undamaged.
- Use a standard 9 kg gas cylinder only, as cylinders that are too small or too large may cause pressure issues.
- After connecting the cylinder, open the valve and check all hoses and connections with soapy water for leaks.
During use:
- Ensure the gas cylinder has more than 1/4 full to maintain proper pressure and flame size.
After use:
- Turn all grill knobs to the off position and close the cylinder valve to seal the regulator.
- It is recommended to remove the regulator after each use and reinstall it next time.
Before using the grill, please make sure to:
Check the gas system
Ensure all knobs are OFF and the regulator is intact., use a standard 9 kg gas cylinder, and check hoses and connections for leaks with soapy water.
Use in a safe location
Operate outdoors only, in a well-ventilated area, away from flammable items and children. Do not use indoors, in vehicles, or on boats.
Inspect the gas hose
Replace the hose if it is worn, cracked, or twisted.
Confirm burner alignment
Make sure burners are correctly aligned with the gas valves to ensure safe ignition.
Contact customer support if you have any concerns before use.
Click here to watch the assembly video and access the digital instruction manual. You can also scan the QR code on the printed manual to view the installation video directly.
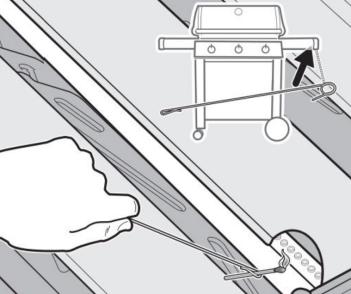
Most of our full-size gas grills include a small chain with a metal rod attached at the end. This is called a match holder. It is used to manually light the grill if the electronic ignition system is not working.
As the grill heats up during use, metal parts such as the handle may also become hot. This is normal. We recommend wearing heat-resistant gloves when handling the grill.
In extremely cold conditions, batteries may drain faster than usual, which is normal. To help prevent this, you can use an external power bank and connect it to the USB port inside the grill cabinet to power the light panel or display (available on select models only). It is also recommended to bring the battery indoors after each use.
Preheating your grill is essential for achieving the best cooking results. It allows the grill to reach the optimal temperature for even heat distribution, ensuring your food cooks properly. In addition, preheating helps prevent food from drying out or sticking to the grates, resulting in better flavor and easier cleanup after grilling.
Yes. At higher altitudes, lower air pressure can affect cooking. You may need to preheat and cook food longer. For best results, keep the lid closed as much as possible and monitor the internal temperature of your food.
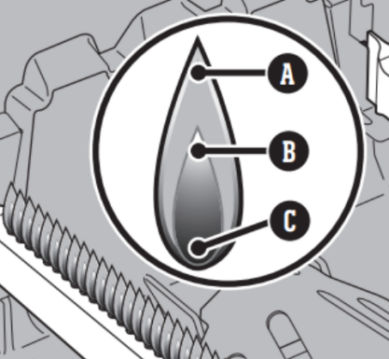
A properly functioning burner flame should show a color gradient:
- Deep blue at the base (A)
- Light blue in the middle (B)
- Occasional yellow flickers at the tip (C)
This indicates the correct air-to-gas mixture.
If the flame appears uneven or irregular, it’s recommended to clean the burner regularly (at least once a month) following the maintenance guidelines.
To connect your grill via Bluetooth, follow these steps:
- Search and download the app “Monument Grills” from your app store.
- Turn on your phone’s Bluetooth and power on the grill’s digital display.
- Open the app and tap the “Add Device” button to search for nearby grills.
- When your grill appears, tap “Add” and confirm to complete the connection.
- Once connected, you’ll see a confirmation checkmark. You can also rename your grill if needed.
After pairing, you’ll be able to monitor real-time temperature, adjust probe settings, and access cooking recipes directly in the app.
Bluetooth Range:
- Up to 115 ft in open, unobstructed areas
- Around 10 ft with walls or obstacles (may vary depending on environment)
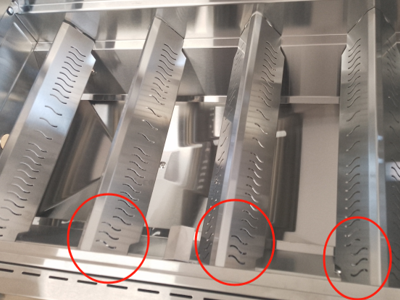
Proper placement of the flame tamers is important for optimal performance. Make sure the front and back are not reversed, as incorrect positioning can affect flame distribution and cooking results. Please install them in the correct orientation as shown in the image below.
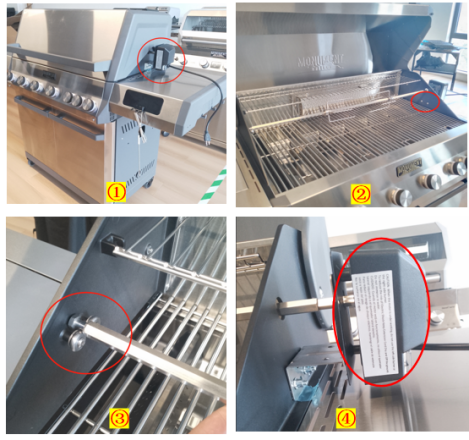
To remove or install the rotisserie chicken spit:
- Remove the two inner screws (FIG. 1 & 2).
- Take off or attach the chicken insert assembly (FIG. 3 & 4).
Please refer to the images below for guidance.
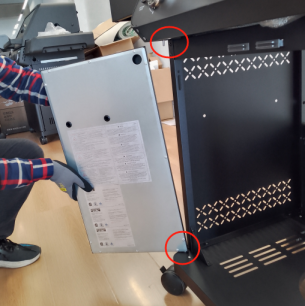
The battery locations are as follows:
- E405: Powered by the battery pack under the storage shelf (FIG. 1).
- E425: Powered by the battery pack in the right side panel (FIG. 2).
- E605: Powered via an adapter (FIG. 3).
Please refer to the images above for guidance.
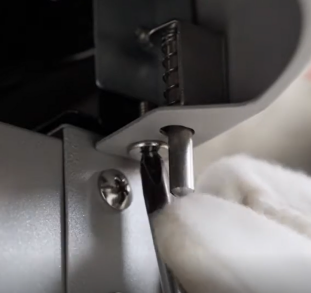
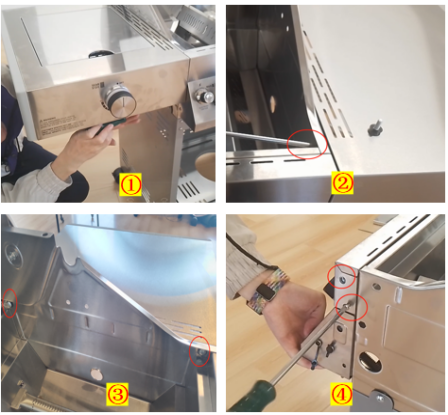
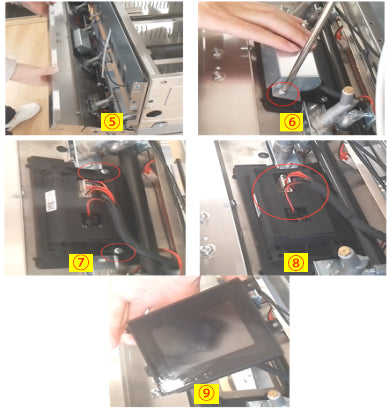
Follow these steps to safely remove and reinstall the display screen (FIG. 1–9):
- Take out the lower furnace assembly (FIG. 1).
- Use a Phillips screwdriver to remove the screws of the storage rack, then remove the rack (FIG. 2 & 3).
- Remove the screws on the second side of the control panel (FIG. 4).
- Carefully remove the control panel components by hand (FIG. 5).
- Remove the screws of the display bracket with a Phillips screwdriver (FIG. 6).
- Remove the screws of the display screen using a Phillips screwdriver (FIG. 7).
- Unplug the display connector and remove the display screen (FIG. 8 & 9).
Note: Ensure all control panel components are securely reassembled when reinstalling the display screen.
Please refer to the images below for guidance.
If you are using a propane model, first turn all burner control knobs, including the side burner, to the OFF position. Then close the valve on top of the propane tank.
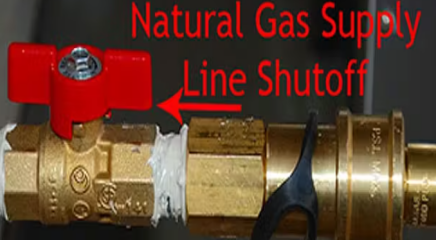
If you are using a natural gas model, first turn all burner control knobs, including the side burner, to the OFF position. Then shut off the gas supply valve on the natural gas line.
Note: Always turn off the gas supply when the grill is not in use.
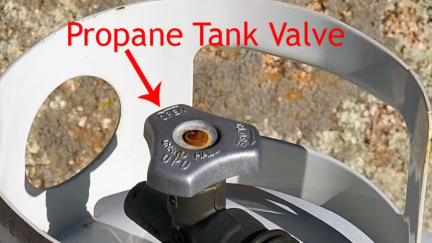
You should disconnect the propane tank when it is empty, when the grill is being stored in a garage or enclosed space, or when the grill is being transported. Before disconnecting, always make sure the valve on the propane tank is fully turned off.
To prevent animals and mold, always clean out food residue and grease from the grill after each use, as leftover debris can attract pests and promote mold growth. Keep the grill covered when not in use.
If you notice signs of animals or mold inside the grill, preheat the grill for about 15 minutes, then clean it thoroughly using a soft brush or cloth with mild detergent.
Since grills are used outdoors, rust can occur over time. To help prevent rust, avoid using sharp or abrasive tools on porcelain-coated or painted surfaces, as this can damage the coating and accelerate oxidation.
For stainless steel surfaces, apply a thin layer of stainless steel cleaner or food-grade oil and wipe along the grain to create a protective film. Avoid using strong acidic or alkaline cleaners, and use mild detergent instead.
To remove rust, gently scrub the affected area with a nylon brush and a cleaner such as Bar Keepers Friend. This can help clean the surface and provide a layer of protection against further rusting. For best results, we recommend using the Bar Keepers Friend Ultimate Cleaning Kit for effective grill surface care.
Please note that proper maintenance and care can help extend the life of your grill. For more information about coverage, exclusions, and warranty details, please visit our Monument Grills Warranty Policy.
Cleaning & Upkeep
Regular cleaning is essential for both safe use and optimal performance. Always avoid harsh chemicals (strong acids or alkalis) and sharp metal tools, as they can damage surfaces and cause corrosion. Use mild detergent and soft cleaning tools instead.
Lid (Interior):
Remove built-up grease and carbon deposits using a grill brush or a plastic scraper. After each use, while the grill is still warm, wipe the inside of the lid with a paper towel to prevent buildup. (Carbonized grease is normal and non-toxic but can flake off over time and affect food quality.)
Cooking Grates:
Preheat the grill on high for about 15 minutes, then clean the grates with a soft brush and mild detergent. Do not use self-cleaning methods or wrap grates in foil for heating, as this may damage the coating.
Heat Plates (Flame Tamers):
While still warm after use, wipe with a soft cloth and mild detergent. For heavy buildup, preheat the grill for 15 minutes, then use a plastic scraper and soft cloth to clean thoroughly.
Burners:
Clean the burner ports with a soft brush after use, and perform a deeper clean about once a month. Be careful not to damage the ignition wire. Ensure burner holes are not blocked and are properly aligned with the gas valve when reinstalling.
Firebox & Grease Tray:
Remove grease buildup inside the firebox using a plastic scraper, then clean with a soft brush and mild detergent. After each use, pull out the grease tray, dispose of the liner, and replace it with a new one.
To keep your grill looking its best and prevent damage, use appropriate cleaning methods for different materials:
Stainless Steel Parts:
Clean with a non-toxic, non-abrasive stainless steel cleaner and a soft cloth. Always wipe in the direction of the grain. Avoid using strong acids, alkaline cleaners, or sharp tools.
Painted, Porcelain-Coated, and Plastic Parts:
Clean with mild detergent and a soft cloth or paper towel. Rinse with clean water and dry thoroughly with a soft cloth.
Note:
If your grill is located in coastal, humid, or chlorine-exposed environments, rust may develop more easily. In such cases, use a stainless steel cleaner to remove rust and apply a polish to maintain the finish. It is also recommended to keep the grill covered when not in use.
Delivery
Order & Payment
Check out our physical Gift Cards or E-Gift Cards, perfect for those who are out of sight, but never out of mind.
After-sales
Our grills come with a warranty of up to 8 years on selected components. For full details about coverage and terms, please click here to view our complete warranty policy.
Note: This warranty policy applies to products purchased after August 20, 2024.
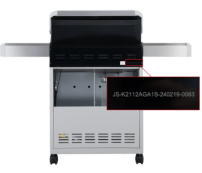
The serial number is located on the back of your grill (see image reference). We recommend submitting your request through our online form for faster processing.
You can submit a claim directly through our warranty request page.
If you prefer to contact us by email or phone, please provide the following information:
- Serial number
- Proof of purchase
- Photos of the issue or damaged parts
Contact Information:
Email: customerservice@monumentgrills.com
Phone: +1 800-530-9133 (Monday to Friday, 9:00 AM – 5:00 PM EST)
Yes. You can still purchase replacement parts and repair your grill, but all costs are not covered under warranty. You may contact Monument Grills to purchase the required replacement parts.
If the part is covered under warranty, the shipping cost will be covered by the seller.
If it is out of warranty, replacement parts can be purchased from the official website, and shipping costs will be the customer’s responsibility.
The warranty does not cover the following situations:
- Damage caused by natural disasters (such as storms, hurricanes, or earthquakes)
- Improper use, installation, or maintenance by the user (including grease fires or use of incorrect parts)
- Commercial or rental use
- Rust or oxidation caused by environmental factors (such as chemicals, high humidity, or corrosive conditions)
- Damage from grease fires, physical impact, or severe weather
- Normal wear and tear, including igniter batteries, paint loss, discoloration, rusting, or burn-through
- Products purchased second-hand or from unauthorized sellers (e.g., non-official sellers, eBay, Facebook Marketplace)
- Shipping damage not caused by non-official carriers
Our warranty covers manufacturing defects only and does not include normal wear and tear.
Normal wear and tear refers to changes that occur over time with regular use, such as surface rust, dents, scratches, or general appearance deterioration. Damage caused by natural conditions or wildlife is also not covered under warranty.


